Before you start integrating with sgID, you will need to register a client with sgID. After registration, you will receive sgID client credentials, which include OAuth 2.0 client credentials and a private key that identifies your client. These credentials are important for your application to:
Authenticate with sgID
Enforce end-to-end encryption of the end user's data
We highly recommend integrating with sgID using one of our SDKs to simplify the integration process.
If you do not wish to integrate with sgID using our SDKs, feel free to refer to our . The guide discusses how to which is useful if you are using your own OpenID Connect client.
Overview
sgID is a Singapore government identity provider that allows Singapore residents to authenticate with applications and share government-verified data about themselves via the Singpass mobile app.
Some examples of products that have integrated with sgID are Singapore's and .
sgID comes shipped with your . That means anyone with the Singpass mobile app can log in with sgID! Check out our to experience the login flow for yourself!
sgID is publicly available for integration. Use your Singpass mobile app to log into our to generate credentials for your app!
By default, apps that have integrated with sgID can request for the user's full name.
The full list of data fields that sgID supports are available at our data catalog page. If your app requires access to more data fields, you can file a service request to sgID via this form.
Note that Singapore government public officers will have access to the full data catalog after they verify their email in our developer portal.
sgID is completely free to use! There are no integration or usage costs associated with sgID.
If you're ready to try out sgID, get started here.
If you have any questions about sgID, please feel free to contact us at this form!
Integrating With sgID
This page assumes that you have a set of client credentials from the sgID .
sgID provides libraries and examples that make integrating your apps with sgID a breeze. We currently offer SDKs and examples in the following programming languages:
If your app uses a language that we do not have an SDK for, or if you would like to implement your own sgID integration, visit our guide on Custom Integration.
Framework Guides
If you are using one of the following TypeScript / JavaScript frameworks, you can refer to our in-depth guides:
White Paper
The White Paper describes the design goals of the sgID protocol, and goes into detail on the protocol specifics and how it meets these design goals
API Documentation
A list of API endpoints supported by sgID.
The API endpoints listed here are for reference purposes only. sgID users are strongly recommended to use the SDK(s) provided which sends these requests for you.
If there are no SDKs provided for your programming language, please refer to on how to set up your own integration.
Troubleshooting
Some common issues your might face during integration
If you are facing any other issues with integrating with sgID, please contact us !
sgID
sgID is an OpenID Connect (OIDC) by the Singapore government. sgID uses a privacy-preserving version of the OIDC protocol. This allows applications to integrate with sgID based on familiar industry standards, while providing privacy guarantees for end users.
As a government identity provider, sgID distinguishes itself from private sector identity providers because it provides Singapore resident data that is verified by the government to be true. Because the data is both signed and separately encrypted with an end user-specific key pair, this allows sgID to verify that the data is not tampered with when the sgID relying party receives it.
One of the key features of the sgID protocol is its privacy-preserving approach. End user data is encrypted with keys held on their device, so the sgID server handling the transaction cannot read the data that is being transmitted. This means that only the end user knows who they've been transacting with, and what information has been transacted.
sgID enforces client-specific identifiers. This means that different sgID relying parties receive different identifiers for the same end user. For example, if Xiao Ming logs into McDonald's with sgID, McDonald's might receive Xiao Ming's data, identifying him with a system ID of abcde. But if Xiao Ming logs into KFC, with sgID, KFC will receive a different system ID, such as
Integration Patterns
To integrate sgID into your application, you need to understand the different OAuth 2.0 flows based on industry standards. The most popular flows are the authorization code flow (for confidential clients), implicit flow (for public clients), and hybrid flow (for public clients).
Currently, sgID does not support public clients due to the fact that sgID clients need to be able to keep a secret for its end-to-end encryption (E2EE) to work. Therefore, sgID only supports the authorization code flow.
Public clients, such as standalone single-page apps (SPA) or native mobile apps, cannot keep a secret because their source code can easily be inspected to reveal secrets or credentials. As such, any secret for client authentication, such as the OAuth 2.0 client secret or the sgID client private key, is rendered public. This makes it easy to impersonate these clients. As , currently "there aren’t any reliable mechanisms for authenticating pure SPA clients in a browser".
Confidential clients, on the other hand, can maintain the confidentiality of their client credentials or use other secure client authentication methods. They consist of two components:
FAQ (Users)
Frequently asked questions
If you have any questions that aren't answered here, please contact us at this !
User Migrations
This page documents all the breaking changes made to sgID, and contains step-by-step migration guides for existing users.
17 May 2023 - Major release of v2.0 TypeScript SDK. Breaking changes include PKCE and new API method signatures. Deprecation of v1 SDK will take place in 31st December 2023, therefore any existing users who has yet to upgrade their SDK version and implement the necessary code changes for PKCE by then will face disruptions in their applications. Refer to for a step-by-step migration guide.
Framework Guides
If you are using one of the following Python frameworks, you can refer to our in-depth guides:
OAuth 2.0 and OpenID Connect
OAuth 2.0 and OpenID Connect (OIDC) are two widely used identity protocols that help users securely authenticate with and delegate permissions to third-party apps. When you log in to a service with Google, Twitter, or GitHub, you're most likely using OIDC!
Here are some resources for learning more about OAuth 2.0 and OIDC:
If you're interested in learning more about the design of the sgID protocol, you can refer to the sgID White Paper.
Overview
sgID's implementation of OpenID Connect (OIDC) supports the standard authorization code grant type. This means that integration steps are based on the familiar OAuth 2.0 authorization code flow.
A frontend app, which can be a SPA, native mobile app, or server-side rendered (SSR) frontend, and
A backend server that communicates with the sgID server's OpenID Connect (OIDC) endpoints
Since SPAs or mobile apps cannot keep secrets, they cannot be trusted to communicate with the sgID authorization server. Therefore, all communication between the client and sgID must go through the backend server, and the frontend component is not considered an OAuth client.
sgID uses E2EE to keep the transmission of data from the end user to the client private from sgID itself. For this to work, the client needs its own private key to decrypt the end user's data. Since the private key needs to be kept secret, sgID can currently only support confidential clients.
In this documentation, we will discuss three integration patterns:
These integration patterns will help you implement the OAuth 2.0 flows and integrate sgID into your application while ensuring confidentiality and security.
Do not reuse the example code challenge and code verifier provided in the API examples, as this would expose your API requests to PKCE guessing attacks by malicious users. Refer to the example code under the SDKs section on how to generate valid <code_verifier, code_challenge> pairs.
On certain cloud providers, reading the private key as an environment variables may result in this error message. This happens when newline characters \n are escaped and transformed to \\n.
Some known providers are:
Digital Ocean
Fly.io
AWS Elastic Beanstalk
Choose one:
Remove all occurrences of \n from your private key string
Store and read your private key using other secure services like AWS Secrets Manager or Parameter Store
As a government officer, why am I not able to login to my work tool using sgID?
sgID gets government officer information from HR systems through a centralised database. This contains information for agencies that are on the following HR systems:
HRPS
Cumulus
ACE
If your agency does not use one of the above HR systems, you willnot be able to login with sgID.
If your agency is using one of the above HR systems but you're still experiencing issues logging in, please inform your HR department to verify that your email address and work details are correctly entered in your HR system.
The internet can be a dangerous place. We use well-established protocols, like OAuth 2.0 and OpenID Connect to communicate with each other in a well-defined and safe manner.
The problem with data sharing
In the past, sharing personal information with third-party applications online was relatively simple but posed a significant security risk. It was fairly common to share your username and password, which granted full access to your account and data. This created a vulnerability known as "Account Takeover", in which the third party could act maliciously without your knowledge or consent.
OAuth 2.0
To address this issue, the Internet Engineering Task Force (IETF) rolled out the OAuth protocol to enable third-parties to request information or perform actions on your behalf without providing access to your entire account. Today, its current iteration (OAuth 2.0 - RFC 6759) is widely used all over the internet.
OpenID Connect (OIDC)
While OAuth 2.0 provided a framework for users to delegate permission to third-party apps (authorization), the internet still lacked a standard way for federating authentication. OpenID Connect (OIDC) extended the OAuth 2.0 protocol by including a new artifact called the ID token, which serves as a proof of authentication. When using Google to log into a third-party app, you are most likely using the OIDC protocol. That app accepts Google's claims that you are who you say you are, and receives your consent to retrieve (your Google) data or take actions on your behalf!
OIDC provides a secure way for users to authenticate with and share data with third-party apps, but by default, it isn't privacy-preserving. The identity provider (Google, in the example above) knows which third-party apps you're communicating with and what data you're sending them.
To address these privacy concerns, sgID's protocol builds on top of the OIDC protocol to provide end-to-end encryption so that the identity provider does not know who you're communicating with, and the contents of the data that you're sharing with the third-party app. Read more about the sgID protocol !
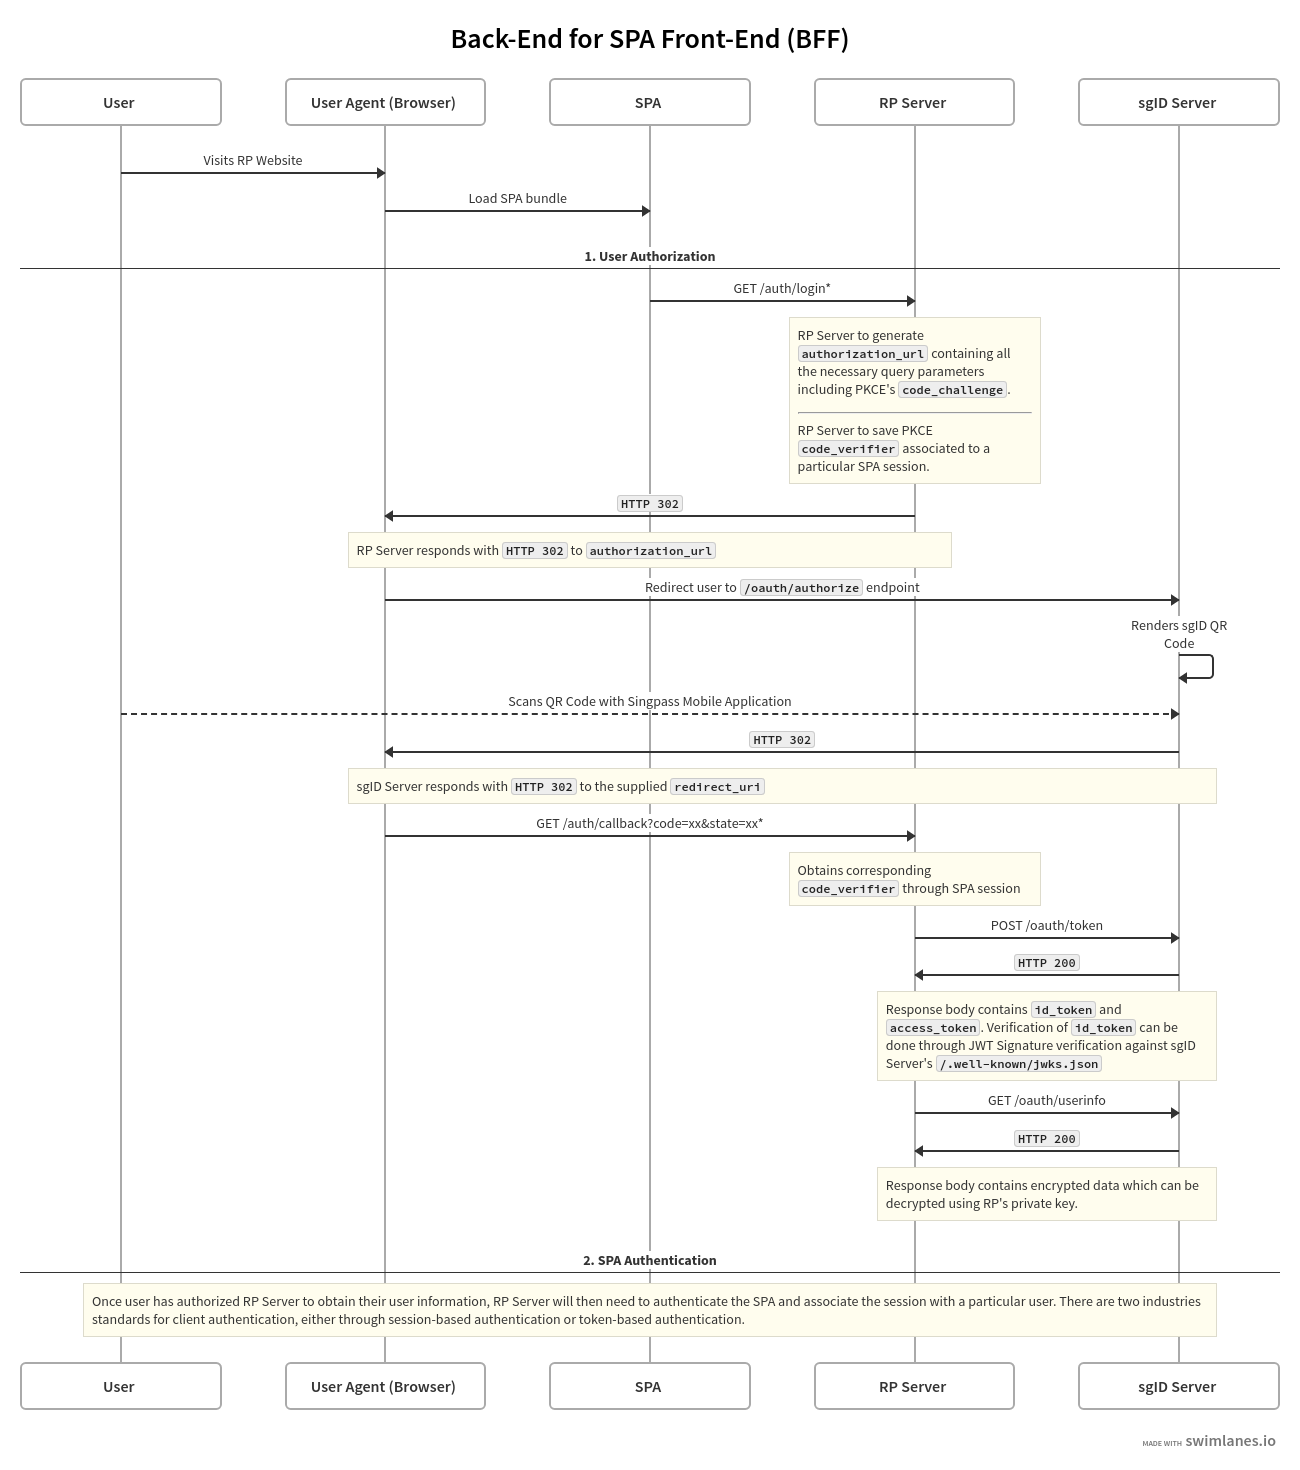
Backend for Single-Page App (SPA) Frontend (BFF)
As discussed in Integration Patterns, sgID does not support public clients like standalone SPAs or native mobile applications. Therefore, when using a SPA frontend, the client must also maintain a backend server which will interact with the sgID server instead of the frontend. This design pattern is known as backend for frontend (BFF).
Typical Flow
The SPA frontend requests a sgID authorization URL from the backend server
The SPA triggers a browser redirect to the sgID authorization URL, where a QR code is rendered
The end user authorizes the transaction by scanning the QR code with their Singpass mobile app, and consents to share their data with the client application
Upon successful authorization, the sgID server sends the registered redirect / callback URL (associated with the web server) to the browser, which redirects to that URL. This URL should be associated with the backend server
The backend server receives the authorization code in the callback URL and exchanges it for an access token and ID token using its client ID and client secret
The backend server then uses the access token to obtain the end user's data from the sgID server userinfo endpoint
The backend server will then authenticate the end user's SPA session, and subsequently log the end user into their app.
Web Server and SSR Frontend
A web server runs the necessary logic to communicate with the sgID server, and generates HTML pages to be sent to the user-agent / browser where it is rendered. The process of generating HTML pages on the server is also known as server-side rendering (SSR).
Typical Flow
End user visits a website (generated by the web server) in their browser
Upon clicking on "Login with sgID", the web server generates an authentication URL and sends the authentication URL to the browser
The browser then redirects to the sgID authorization URL, where a QR code is rendered
The end user authorizes the transaction by scanning the QR code with their Singpass mobile app, and consents to share their data with the web server
Upon successful authorization, the sgID server sends the registered redirect / callback URL (associated with the web server) to the browser, which redirects to that URL
The web server receives the authorization code in the callback URL and exchanges it for an access token and ID token using its client ID and client secret
The web server then uses the access token to obtain the end user's data from the sgID server userinfo endpoint
The web server will then log the end user in and render the logged-in screen
TypeScript / JavaScript
Integrating with TypeScript and JavaScript Node.js applications
If you are using one of the TypeScript / JavaScript frameworks below, you may refer to our in-depth guides:
If not, read on for a framework-agnostic Quick Start in the next section.
The sgID SDK is meant to be used within server-side code (i.e. your backend code). As such, the following steps contain code snippets that should only be run on the server. If you would like to view more details about how your frontend should interact with your backend, please view one of our .
You should generate a new pair for each authorization request, and store the code verifier somewhere you can retrieve it when your user returns from logging into sgID (e.g. in the user's session).
Python
Integrating with sgID in a Python application
If you are using one of the Python frameworks below, you may refer to our in-depth guide:
If not, read on for a framework-agnostic Quick Start in the next section.
The sgID SDK is meant to be used within server-side code (i.e. your backend code). As such, the following steps contain code snippets that should only be run on the server. If you would like to view more details about how your frontend should interact with your backend, please view one of our .
You should generate a new pair for each authorization request, and store the code verifier somewhere you can retrieve it when your user returns from logging into sgID (e.g. in the user's session).
Authorization and authentication are two key concepts in identity and access management (IAM) which are often confused with each other. A simple way to differentiate the two is to remember that:
Authorization is about checking for permissions - whether you have the right to perform the action you want to take
Authentication is about verifying your identity - whether you are who you say you are
You should store the nonce somewhere you can retrieve it when your user returns from logging into sgID, likely in the same place that you store the code verifier.
After your user logs in to sgID, they will be redirected to your redirect URI with the authorization code (code) in the query parameters. At this point, you should retrieve the code verifier and nonce from where they were stored in steps 2 and 3 respectively.
The sub is an end-user's unique sgID identifier, and is used together with the access token in the next step to retrieve the user's data. Feel free to use the sub to identify your user in your application as necessary.
The final step is to retrieve the data, which will contain the scopes requested in step 3.
For more detailed documentation for each function, visit our API reference.
Installing the TypeScript / JavaScript Node.js SDK
Framework Guides
Quick start
Step 1: Initialize the SDK
If you have not already obtained your client credentials via registration, please register your client before proceeding.
Load your sgID credentials in a secure way using environment variables instead of hard-coding them into your app.
Step 2: Generate a code verifier and challenge pair
You should store the nonce somewhere you can retrieve it when your user returns from logging into sgID, likely in the same place that you store the code verifier.
After your user logs in to sgID, they will be redirected to your redirect URI with the authorization code (code) in the query parameters. At this point, you should retrieve the code verifier and nonce from where they were stored in steps 2 and 3 respectively.
The sub is an end-user's unique sgID identifier, and is used together with the access token in the next step to retrieve the user's data. Feel free to use the sub to identify your user in your application as necessary.
The final step is to retrieve the data, which will contain the scopes requested in step 3.
For more detailed documentation for each function, visit our API reference.
from sgid_client import generate_pkce_pair

code_verifier, code_challenge = generate_pkce_pair()
url, nonce = sgid_client.authorization_url(
    code_challenge=pkce_pair["code_challenge"],
    scope = "openid myinfo.name", # replace this with your own scope
)
Installation
Framework guides
Quick start
Step 1: Initialize the SDK
If you have not already obtained your client credentials via registration, please register your client before proceeding.
Load your sgID credentials in a secure way using environment variables instead of hard-coding them into your app.
Step 2: Generate a code verifier and challenge pair
sub, data = sgid_client.userinfo(sub=sub, access_token=access_token)
Step 4: Receive the callback
Step 5: Retrieve the data
API reference
Complete Flow Diagram
Note: the /auth/login and /auth/callback endpoints are to be developed by the relying party (RP) as these endpoints serve as the primary communication channel between RP SPA and RP Server.
First off, you will need to register a client on the sgID Developer Portal. This will provide you with the OAuth 2.0 credentials necessary to authenticate your client with sgID, as well as a private key to decrypt user data.
Click the linkbelow to visit the developer portal and start the registration process!
Before you can register your client, you will have to log in to the sgID Developer Portal using your Singpass mobile app.
Upon login, you will be presented with this view:
Click on the "Register new client" button. When registering a client, you will be prompted to fill in the following details.
Field Name
Description
After completing registration, your client credentials will be generated. Download these credentials and store them in a safe place. The fields in the credentials are as follows.
Key
Value Description
FAQ (Developers)
Frequently asked questions
If you have any questions that aren't answered here, please contact us at this form!
General
Is sgID a government product?
Yes, sgID is run by , a GovTech subsidiary.
How is sgID different from Singpass?
sgID exists as a module in the Singpass mobile app. sgID login uses a different protocol from the usual Singpass login. The sgID protocol is end-to-end encrypted which means that the government cannot see which businesses or government agencies you're communicating with, and what data you're sending to them.
Head to learn more about the sgID protocol!
What are the data fields that are available via sgID?
You can see a full detailed list of data fields that are currently available via sgID in our .
We are in the process of adding more data fields to sgID, so please let us know if there are any particular data fields that you would like to see in sgID via this !
Where does sgID get its data from?
sgID gets its data from , a government-verified data source on Singapore residents.
sgID will also support third-party data sources in the future, so if there is a data source which you would like to access, please let us know via this !
Does sgID support username and password login?
sgID does not support username-password logins.
To login with sgID, you will need:
A Singpass account
Compliance
Is sgID compliant with PDPA (Personal Data Protection Act 2012)?
Yes. The PDPA requires businesses to be compliant with clauses by 1 September 2019, surrounding consent obligation, purpose limitation obligation, and notification obligation, all of which are built into sgID.
Please visit the for more information on the legislation, guidelines, exemption, and enforcement of the PDPA.
Privacy & Security
What privacy and security measures do sgID provide?
sgID employs end-to-end encryption, and does not store any of your data that passes through our servers. Even in the case of a data breach, your data will never be compromised because it remains safely on your phone, in your control.
Technical
How can I access user data in plaintext?
The user data that sgID clients receive are encrypted with a block key, which is in turn encrypted with the public key associated with that client.
To access the data in plaintext, clients will need to:
Decrypt the encrypted block key with their own private key to receive the block key
Can I register more than one redirect URI for my client?
Yes, you can register up to 5 redirect URIs for each client.
You can add new redirect URIs at any time in the developer portal.
The Singpass mobile app installed on your mobile device
Use the block key to decrypt the encrypted user data
The redirect URLs that sgID will be allowed to redirect to after the end user authenticates with the Singpass mobile app.
This should be the endpoint of your own application. If you are following along with the Framework Guides, please refer to the respective pages for the redirect URL to register.
publicKey
The RSA-2048 Public Key used by sgID to encrypt data to be sent to your application
privateKey
The RSA-2048 Private Key that will be used by your application to decrypt received data
Name
Your client display name.
This will be displayed to the end user when they are logging in to your app with the Singpass mobile app.
Description
A brief description of the purpose of your client application.
This will be displayed to the end user when they are logging in to your app with the Singpass mobile app.
Scopes
id
This is your client ID and it is a unique string that identifies your client.
secret
This is your client secret and it is a 32-character string used for exchanging the authorization code for a token.
scopes
Step 1: Log in to the sgID Developer Portal with Singpass
To be eligible for Singpass, you must be at least 15 years old and one of the following
(i) Singapore Citizen
(ii) Permanent Resident
(iii) Foreign Identification Number (FIN) Holder
If you fulfill these requirements, you can register for Singpass here.
Before you can register your client, you will have to verify your email address (preferably your work email).
Step 2: Register a new client
You will still be able to edit these fields even after registering your client.
Please note that if you are not a public sector employee, you will only have access to two data fields: OpenID and NAME. If you require additional user data fields, please fill out this request form. Any additional data fields that are requested must adhere to our privacy and data protection policies. We will then review your request and get back to you as soon as possible.
Click on 'Get Started' to login to the developer portal with Singpass
Click on 'Register new client'
How your client fields are displayed in the Singpass mobile consent screen
Click on 'Download credentials'
The maximum list of that your app will be authorized to access. Please refer to the for the full list of scopes offered by sgID.
The maximum list of that your app is authorized to access.
TypeScript SDK v2.0 Major Release
This document documents the major changes introduced in v2.0.0 sgID TypeScript SDK, and serves as a step-by-step guide for existing v1.x.x sgID TypeScript SDK users to upgrade their version to v2.x.x.
For confidential clients, the use of PKCE [RFC7636] is RECOMMENDED, as it provides a strong protection against misuse and injection of authorisation codes as described in Section 4.5.3.1 and, as a side-effect, prevents CSRF even in presence of strong attackers as described in Section 4.7.1.
SgidClient.authorizationUrl(), SgidClient.callback(), and SgidClient.userinfo() now take in a single as a parameter, instead of sequential, possibly optional parameters. Refer to SgidClient’s module file SgidClient.d.ts for implementatino details.
sub is now required in userinfo() calls, which can be retrieved from the response returned from callback() .
In light of all the breaking changes above, users are strongly recommended to refer to the example upgrade path outlined below to safely migrate their applications to v2.x SDK. Deprecation of the v1.x SDK will take place in 31st December 2023, therefore any existing users who has yet to upgrade their SDK version by then will face disruptions in their application(s).
The has been revamped, containing the newest changes. Users can refer to the documentation for a better understanding of how sgID works.
The code below assumes the following contexts for Client Application:
Client Application is a full stack web application.
Client Application consists of a SPA and an Express back-end server.
Client Application manages state in its back-end server's session.
Refer to the for how a Next.js implementation might look like.
Run npm i @opengovsg/sgid-client@2.0.0 (or any newer minor/patch versions released in the future) for all directories that
contain a package.json file, and
have a dependency to @opengovsg/sgid-client in the corresponding package.json file.
For every OAuth request, generate a PKCE pair (consisting of code challenge and code verifier). Do not reuse the same PKCE pairs for any requests.
Call authorizationUrl() with the correct options object.
Store the codeVerifier with the corresponding session ID, alongside its state and nonce if applicable:
Retrieve the code verifier from the session and pass it in callback()as part of the options object.
Note the inclusion of sub as one of the fields in the options object.
You should have the v2 SDK successfully integrated into your application!
Q: What if my application does not follow the same architecture as the example Application described?
A: Unfortunately it is infeasible to list out all possible upgrade paths as there are too many possible architectures for an application in practice. However, the example upgrade path should serve as an adequate reference guide for the necessary changes to migrate to v2 SDK.
Q: I'm stuck at Step X and I don't know what to do. How can I proceed?
A: Feel free to drop us a message at this for further clarification.
API Reference
This page contains comprehensive API documentation for the Python SDK. If you're looking to get started quickly, visit our or our .
Calculates the S256 code challenge for a provided code verifier.
Args
code_verifier (str) The code verifier.
Returns
str The calculated code challenge.
Generates the random code verifier.
Args
length (int, optional) The length of the code verifier to generate. Defaults to 43.
Raises
Exception if length is <43 or >128.
Returns
str: The generated code verifier.
Generates a challenge pair where code_challenge is the generated S256 hash from code_verifier.
Args
length (int, optional) The length of the code verifier. Defaults to 43.
Raises
Exception if length is <43 or >128.
Returns
GeneratePkcePairReturn: Code challenge and code verifier.
Class which allows you to interact with the sgID API.
Initialises an SgidClient instance.
Args
client_id (str) Client ID provided during client registration.
client_secret (str) Client secret provided during client registration.
private_key (str) Client private key provided during client registration.
redirect_uri (str | None, optional) Redirection URI for user to return to your application after login. If not provided in the constructor, this must be provided to the authorization_url and callback functions. Defaults to None.
hostname (str, optional) Hostname of OpenID provider (sgID). Defaults to "https://api.id.gov.sg".
Raises
Exception if private key is invalid.
Generates authorization url to redirect end-user to sgID login page.
Args
code_challenge (str) The code challenge generated from generate_pkce_pair().
state (str | None, optional) A string which will be passed back to your application once the end-user logs in. You can also use this to track per-request state.
redirect_uri (str | None, optional) The redirect URI used in the authorization request. If this param is provided, it will be used instead of the redirect URI provided in the SgidClient constructor. If not provided in the constructor, the redirect URI must be provided here. Defaults to None.
scope (str | list[str]) "openid" must be provided as a scope. Defaults to "openid myinfo.name".
nonce (str | None, optional) Unique nonce for this request. If this param is not provided, a nonce is generated and returned. To prevent this behaviour, specify None for this param. Defaults to secrets.token_urlsafe(32).
Raises
Exception if redirect URI is provided in neither the constructor nor this function.
Returns
AuthorizationUrlReturn: Authorization URL and nonce.
Exchanges authorization code for access token.
Args
code (str) The authorization code received from the authorization server.
code_verifier (str) The code verifier corresponding to the code challenge that was passed to authorization_url for this request.
nonce (str | None, optional) Nonce passed to authorization_url for this request. Specify None if no nonce was passed to authorization_url. Defaults to None.
redirect_uri (str | None, optional) The redirect URI used in the authorization request. If not specified, defaults to the one passed to the SgidClient constructor.
Raises
Exception if call to token endpoint fails.
Exception if call to JWKS endpoint fails.
Exception if ID token validation fails.
Exception if access token validation fails.
Returns
CallbackReturn: The sub (subject identifier claim) of the user and access token. The subject identifier claim is the end-user's unique ID.
Retrieves verified user info and decrypts it with your private key.
Args
sub (str) The sub returned from the callback function.
access_token (str) The access token returned from the callback function.
Raises
Exception if call to userinfo endpoint fails.
Exception if sub returned from userinfo endpoint does not match sub passed to this function.
Exception if decryption fails.
Returns
UserInfoReturn: The sub of the end-user and the end-user's verified data. The sub returned is the same as the one passed in the params.
This page contains comprehensive API documentation for the TypeScript / JavaScript SDK. If you're looking to get started quickly, visit our or our .
The source code can be found on .
Converts a private key in PKCS1 format to PKCS8.
Parameters
<string> Private key as a string.
Returns
get
Create an sgID authorization URL to redirect your user to so that they can authenticate with Singpass
Query parameters
response_typestring · enumRequired
Must be set to code because sgID only supports the authorization code flow
Example: codePossible values:
client_idstringRequired
sgID client ID which was provided to you during client registration
Example: MYCLIENT-PROD
redirect_uristringRequired
The callback URL that was provided during registration. sgID redirects to this URL with the authorization code after the user authenticates with Singpass
Example: https://example.com/callback
scopestringRequired
A URL-encoded string of the scopes your client will request for
Randomly generated string to be returned in the ID token. Used to prevent replay attacks as part of the OpenID Connect 1.0 spec
Example: BQO8SV3ALIYA808IZ8O7PKWRI8A8X6MI
statestringOptional
A unique and non-guessable value associated with each authentication request about to be initiated. Used to prevent CSRF attacks and to maintain state as part of the OAuth 2.0 spec (RECOMMENDED)
Example: tk39drykro3
code_challenge_methodstringRequired
The method used to verify the code challenge. Throws an error response if the value is not 'S256'
Example: S256
code_challengestringRequired
A SHA256 hashed string that should be used to verify against the code verifier in the token request
Exchange auth code for access token as part of sgID authorization code flow
Body
client_idstringRequired
sgID client ID which was provided to you during client registration
client_secretstringRequired
sgID client secret which was provided to you during client registration
codestringRequired
Authorization code that was received from the callback URL after the user authenticates with Singpass
grant_typestringRequired
This field must take the value authorization_code as sgID only supports the OAuth 2.0 authorization code flow
code_verifierstringRequired
A cryptographically random string that was used to generate your code challenge in the authorization request
get
Exchange access token for user info as part of sgID authorization code flow
Authorizations
AuthorizationstringRequired
Bearer authentication header of the form Bearer <token>.
Responses
200
Successfully retrieve user info from sgID
application/json
substringOptional
End user's unique identifier for your client - This is the same value as the sub claim in the id_token returned from the previous response.
Note that as part of sgID's privacy-preserving measures, each end user's unique identifier is different for each sgID client
keystringOptional
An AES-128-GCM symmetric key, or a block key, that is encrypted with your client's RSA-2048 public key.
dataobjectOptional
JSON object which contains the data you requested in your application scope. To prevent sgID from reading the data, the payload is encrypted with the block key referenced in the definition for the key attribute in the same response body.
Refer to our onboarding guide for instructions on decrypting the payload.
401
Missing or invalid bearer token
text/plain
500
Server error
text/plain
get
Responses
200
A JSON object representing sgID's public keys
application/json
A JWK container object which contains an array of JWK Key Objects. See the IETF document for JSON Web Key (JWK) for more details.
keysobject[]Optional
Each of the items in the array is a JWK Key Object
JSON array containing a list of the JWS signing algorithms (alg values) supported by sgID for the ID Token to encode the Claims in a JWT
Example: ["RS256"]
subject_types_supportedstring[]Optional
JSON array containing a list of the Subject Identifier types that sgID supports
Example: ["pairwise"]
code_challenge_methods_supportedstring[]Optional
JSON array containing a list of supported code challenge methods for PKCE
Example: ["S256"]
<string> Private key in PKCS8 format.
Calculates the S256 code challenge for a provided code verifier.
Parameters
<string> The code verifier.
Returns
<string> The calculated code challenge.
Generates the random code verifier.
Parameters
<number> (Optional) The length of the code verifier to generate. Defaults to 43.
Throws
Error if length is < 43 or > 128.
Returns
<string> The generated code verifier.
Generates a challenge pair where code_challenge is the generated S256 hash from code_verifier.
Parameters
<number> (Optional) The length of the code verifier. Defaults to 43.
Throws
Error if length is < 43 or > 128.
Returns
<Object>
codeChallenge: <string> S256 code challenge generated from the code verifier.
codeVerifier: <string>
Class which allows you to interact with the sgID API.
Initialises an SgidClient instance.
Parameters
<Object>
clientId: <string> Client ID provided during client registration.
clientSecret: <string> Client secret provided during client registration.
privateKey: <string> Client private key provided during client registration.
redirectUri: <string> (Optional) Redirection URI for user to return to your application after login. If not provided in the constructor, this must be provided to the authorization_url and callback functions.
hostname: <string> (Optional) Hostname of OpenID provider (sgID). Defaults to "https://api.id.gov.sg".
Generates authorization url to redirect end-user to sgID login page.
Parameters
<Object>
state: <string> (Optional) A string which will be passed back to your application once the end-user logs in. You can also use this to track per-request state.
scope: <string> | <string[]> (Optional) Scopes being requested. Can be provided as a string array or a space-concatenated string. "openid" must be provided as a scope. Defaults to "openid myinfo.name".
nonce: <string> | <null> (Optional) Random, unique value to associate a user-session with an ID Token and to mitigate replay attacks. Set as null to omit the nonce. Defaults to a randomly generated nonce if unspecified or set as undefined.
redirectUri: <string> (Optional) The redirect URI used in the authorization request. If this param is provided, it will be used instead of the redirect URI provided in the SgidClient constructor. If not provided in the constructor, the redirect URI must be provided here. Defaults to the redirectUri provided in the constructor.
codeChallenge: <string> The code challenge generated from generatePkcePair().
Throws
Error if redirect URI is provided in neither the constructor nor this function.
Returns
<Object>
url: <string> Generated authorization url.
nonce: <string> | <undefined> Provided nonce, randomly generated nonce, or undefined (based on nonce input). Should be stored in the user's session so it can be retrieved later for use in callback.
Exchanges authorization code for access token.
Parameters
<Object>
code: <string> Authorization code returned in query params via the redirect URI after login.
nonce: <string> | <null> (Optional) Nonce returned from authorizationUrl (Set as null if nonce was set as null in authorizationUrl).
redirectUri: <string> (Optional) Overriding redirect URI used in authorizationUrl (if provided). Defaults to the redirectUri provided in the constructor.
codeVerifier: <string> Code verifier for the code challenge provided in authorizationUrl.
Throws
Error if call to token endpoint fails.
Error if call to JWKS endpoint fails.
Error if ID token validation fails.
Error if access token validation fails.
Returns
<Promise<Object>>
sub: <string> Sub (subject identifier claim) which is the end-user's unique ID.
accessToken: <string> Access token used to request user info.
Retrieves verified user info and decrypts it with your private key.
Parameters
<Object>
sub: <string> Sub obtained from callback.
accessToken: <string> Access token obtained from callback.
Throws
Error if call to userinfo endpoint fails.
Error if sub returned from userinfo endpoint does not match sub passed to this function.
Error if decryption fails.
Returns
<Object>
sub: <string> Represents a unique identifer for the end-user.
data: <Record<string, string>> A JSON object containing end-user info where the keys are the scopes requested in authorizationUrl.
This page provides a step-by-step guide on how to integrate the Python SDK in a simple Flask server. This Flask server will be used as a backend server for a SPA frontend.
To illustrate our example, we have prepared a demo app which will allow you to retrieve your user's name and favorite ice cream flavor after they log in with sgID.
sgID login page with an ice cream flavour selector
If you have not already obtained your client credentials via registration, please before proceeding.
For this example, you should add:
1. [openid, myinfo.name] as the scopes and
2. http://localhost:5001/api/redirect as a redirect URL
Running the example locally
Step 1: Clone the repo
To run the example locally, clone from our source code by running:
# Clone the frontend repository
git clone https://github.com/opengovsg/sgid-demo-frontend-spa.git
cd sgid-demo-frontend-spa
cat .env.example > .env # Copy the `.env.example` file
npm install

cd ..

# Clone the backend repository
git clone https://github.com/opengovsg/sgid-client-python.git
cd sgid-client-python/examples/flask
cat .env.example > .env # Copy the `.env.example` file
pip install -r requirements.txt
Step 2: Update your environment variables
Update your .env file with your client credentials.
In separate terminals, run the frontend and the backend.
# In the /sgid-client-python/examples/flask directory
flask run

# Open a new terminal and in the /sgid-demo-frontend-spa directory
npm run dev
Ensure that your backend Flask server is running on and visit .
If you click on 'Login with Singpass' and authenticate with your Singpass mobile app, you should see your user info on the success screen.
In this section, we'll break down the different steps that our example app goes through.
In this step, we will create an instance of our SgidClient class which will help us to interface with the sgID server.
In the .env file created from the previous step, fill out your sgID credentials.
Next, initialize the SDK by calling the constructor and passing in the environment variables.
Before we create the endpoints, we will need to configure the Flask app.
When an end user clicks on the sign in button on your application (e.g. 'Login with Singpass app'), it should make a GET request to this endpoint to retrieve the authorization URL. The browser is then redirected to this authorization URL.
The /api/auth-url endpoint should do the following
Generate a session ID
Generate a PKCE pair (consisting of code challenge and code verifier)
Generate an authorization URL
After the user scans the QR code with their Singpass mobile app and authorizes your application to access the specified scopes, the sgID server will redirect the user's browser to the redirect_uri you specified earlier (either when initializing the SDK or when passed as a parameter to the authorization_url function).
The redirect will include the authorization code and the state (if provided earlier) in the form of query parameters. An example URL would look something like this
The /api/redirect endpoint should do the following
Retrieve the authorization code from query params, and the session ID from browser cookies
Retrieve the code verifier from session
Exchange the authorization code and code verifier for the access token
Once the browser has been redirected to a logged in/success page, your app can make a GET request to this endpoint which will use the access token stored in session to request user info from the sgID server.
The /api/userinfo endpoint should do the following
Retrieve the session ID from browser cookies
Retrieve the access token from memory using the session ID
Request user info using the access token
Now that your Flask server has been set up properly, you will need to integrate your frontend application with it.
If you have followed the steps from , the frontend and backend examples have already been integrated for you.
However, if you would like to integrate with your own frontend application, there are two main steps you need to implement:
A page with a 'Login with Singpass' button
Click for the relevant code in the frontend repo.
The button will need to make a GET request to the /api/auth-url
You have reached the end of the Flask step-by-step guide.
If you want to find out more about how sgID works, click here to .
If you have more questions about sgID, check out our for answers to common questions.
Redirect the browser to a logged in page (or any page of your choice)
Return the user info
endpoint and then redirect the browser to the received authorization URL.
Fetching the user info after logging in
Click here for the relevant code in the frontend repo.
After the user logs in, the frontend can make a GET request to the /api/userinfo endpoint to retrieve the user info.
Breaking the example down
Step 1: Initialize the SDK
The main idea here is to load your sgID credentials in a secure way using environment variables instead of hard-coding them into your app.
Step 2: Create the /api/auth-url endpoint
Step 3: Create the /api/redirect endpoint
If your application only needs to verify that a user is a real person with a Singpass account without needing to access any government-verified data, then you can stop here and utilize the sub value to identify the user.
Step 4: Create the /api/userinfo endpoint
Step 5: Integrate the frontend and backend
Congratulations! 🎉
While these examples should work seamlessly in a local environment (i.e. localhost), they may not work if deployed (specifically if the frontend and backend are deployed on different domains).
This is due to the SameSite attribute on cookies. For these examples to work in a deployed environment, you would need to either
Utilize a reverse proxy to deploy the frontend and backend on the same domain; or
Set the SameSite attribute as None to be able to set cookies on a different domain
from sgid_client import SgidClient

PORT = 5001

sgid_client = SgidClient(
    client_id=os.getenv("SGID_CLIENT_ID"),
    client_secret=os.getenv("SGID_CLIENT_SECRET"),
    private_key=os.getenv("SGID_PRIVATE_KEY"),
    redirect_uri=f"http://localhost:{PORT}/api/redirect",
)
from flask import (
    Flask,
    request,
    make_response,
    redirect,
    abort,
)
from flask_cors import CORS

# In-memory store for user session data
# In a real application, this would be a database.
session_data = {}
SESSION_COOKIE_NAME = "exampleAppSession"

app = Flask(__name__)
# Allow app to interact with demo frontend
frontend_host = "http://localhost:5173"
CORS(app, origins=[frontend_host], supports_credentials=True)
index.py
from flask import request
from uuid import uuid4
from urllib.parse import urlencode
from sgid_client import SgidClient, generate_pkce_pair

@app.route("/api/auth-url")
def get_auth_url():
    ice_cream_selection = request.args.get("icecream")
    session_id = str(uuid4())
    # Use search params to store state so other key-value pairs
    # can be added easily
    state = urlencode(
        {
            "icecream": ice_cream_selection,
        }
    )
    # We pass the user's ice cream preference as the state,
    # so after they log in, we can display it together with the
    # other user info.
    code_verifier, code_challenge = generate_pkce_pair()
    url, nonce = sgid_client.authorization_url(
        state=state, code_challenge=code_challenge
    )
    session_data[session_id] = {
        "state": state,
        "nonce": nonce,
        "code_verifier": code_verifier,
    }
    res = make_response({"url": url})
    res.set_cookie(SESSION_COOKIE_NAME, session_id, httponly=True)
    return res
from flask import request, redirect

frontend_host = os.getenv("SGID_FRONTEND_HOST") or "http://localhost:5173"

@app.route("/api/redirect")
def redirect():
    auth_code = request.args.get("code")
    state = request.args.get("state")
    session_id = request.cookies.get(SESSION_COOKIE_NAME)

    session = session_data.get(session_id, None)
    # Validate that the state matches what we passed to sgID for this session
    if session is None or session["state"] != state:
        return redirect(f"{frontend_host}/error")

    sub, access_token = sgid_client.callback(
        code=auth_code, code_verifier=session["code_verifier"], nonce=session["nonce"]
    )
    session["access_token"] = access_token
    session["sub"] = sub
    session_data[session_id] = session

    return redirect(f"{frontend_host}/logged-in")
index.py
from flask import request, abort
from urllib.parse import parse_qs

@app.route("/api/userinfo")
def userinfo():
    session_id = request.cookies.get(SESSION_COOKIE_NAME)
    session = session_data.get(session_id, None)
    access_token = (
        None
        if session is None or "access_token" not in session
        else session["access_token"]
    )
    if session is None or access_token is None:
        abort(401)
    sub, data = sgid_client.userinfo(sub=session["sub"], access_token=access_token)

    # Add ice cream flavour to userinfo
    ice_cream_selection = parse_qs(session["state"])["icecream"][0]
    data["iceCream"] = ice_cream_selection

    return {"sub": sub, "data": data}
Data Catalog
What data fields / scopes are provided by sgID?
The following table shows the list of available scopes from MyInfo that a sgID relying party can request. The scopes that your application can access are determined during client registration.
Please note that for all string fields, you might receive a value of NA if the data does not exist for that individual
Data item
Scope
Description
Value
Principle name
Custom Integration
You will need to write your own custom sgID integration if your app uses a programming language that sgID does not have a SDK for. This page provides a guide for how to implement this custom integration.
When a user tries to log in to your application with sgID, you need to:
myinfo.name
Full name of user printed on NRIC or FIN card. Includes Surname if any
stringe.g. Denise Tan Hui Min
NRIC/FIN
myinfo.nric_number
NRIC number or FIN of user. NRIC number is the unique identifier given to every Singapore Citizens (SC) and Permanent Residents (PR), while FIN is the unique identifier for Foreigners (FIN)
stringe.g. S9876543A
Date of Birth
myinfo.date_of_birth
Date of birth of the user
string (YYYY-MM-DD)
e.g. 1965-08-09
However, on occasion, you might also observe the following formats for individuals for whom date of birth data is missing:
- (YYYY-MM) e.g. 1965-08
- (YYYY) e.g 1965
Passport number
myinfo.passport_number
Passport number of the user
stringe.g. E35463874W
Passport expiry date
myinfo.passport_expiry_date
Passport expiry date of the user
string (YYYY-MM-DD)
e.g. 2030-08-09
Mobile number
myinfo.mobile_number
Mobile number of the user
string (8-digit number without Country Code)
e.g. 87654321
Email address
myinfo.email
Email address of the user
stringe.g. sgid@open.gov.sg
Registered address
myinfo.registered_address
Registered address of the user. For SC/PR - Registered address is the address that is printed on the NRIC card.
string (with \n)
e.g. 102 BEDOK NORTH AVENUE 4\n#09-128\nSINGAPORE 460102
Sex
myinfo.sex
Gender of the user
stringe.g. MALE
Race
myinfo.race
Race of the user
stringe.g. MALAY
Nationality
myinfo.nationality
Nationality of the user
stringe.g. SINGAPOREAN
Residential Status
myinfo.residentialstatus
Residential status of the user
stringe.g. SINGAPORE CITIZEN
Housing Type
myinfo.housingtype
Housing Type of the user
stringe.g. HDB
HDB Type
myinfo.hdbtype
HDB Type of the user
stringe.g. 4-ROOM FLAT (HDB)
Birth Country
myinfo.birth_country
Birth Country of the user
stringe.g. SINGAPORE
Vehicles Details
myinfo.vehicles
Details of vehicles owned by the user
string (stringified array of objects with the following attributes:
- vehicle_number
)
e.g. []or
(MOM) Name of Employer
myinfo.name_of_employer
Name of user's employer registered with MOM
stringe.g. GovTech
(MOM) Workpass Status
myinfo.workpass_status
Workpass status of the user
stringe.g. Active
(MOM) Workpass Expiry Date
myinfo.workpass_expiry_date
Workpass expiry date of the user
stringe.g. 2025-12-04
Marital Status
myinfo.marital_status
Marital status of the user
stringe.g. SINGLE
Mobile Number (Formatted with country code)
myinfo.mobile_number_with_country_code
Mobile number of the user formatted with prefix and country code
stringe.g. +65 81235678
Dialect
myinfo.dialect
Dialect of the user
stringe.g. TEO CHEW
Occupation
myinfo.occupation
Occupation of the user
stringe.g. ACCOUNTANT
Country of Marriage
myinfo.country_of_marriage
Country of Marriage of the user
stringe.g. SINGAPORE
Marriage Certificate Number
myinfo.marriage_certificate_number
Marriage Certificate Number of the user
stringe.g. 35678
Marriage Date
myinfo.marriage_date
Marriage date of the user
stringe.g. 2025-12-04
Divorce Date
myinfo.divorce_date
Divorce date of the user
stringe.g. 2025-12-04
Children Birth Records
myinfo.children_birth_records
For Singaporean citizens and Permanent Residents only.
string (stringified array of objects with the following attributes:
- birth_cert_no
- name
- date_of_birth
- sex
- race
e.g. [] or [{"birth_cert_no":"T1808765G", "name":"ABC", "date_of_birth":"2018-04-13","sex":"FEMALE","race":"CHINESE","life_status":"ALIVE","secondary_race":"MALAY","vaccination_requirements":[{"fulfilled":"TRUE","requirement":"Preschool Admission Vaccination Min Requirement Fulfilled"}],"is_sg_citizen_at_birth":"Y"}]
Sponsored Children Records
myinfo.sponsored_children_records
For Singaporean citizens, Permanent Residents, and Long Term Visit Pass holders only.
string (stringified array of objects with the following attributes:
- nric
- name
- date_of_birth
- sex
- race
The last 4 characters of an individual's NRIC / FIN.
Derived from the myinfo.nric_number field.
stringe.g. *****123A
Age above 18 years old
myinfo.is_age_above_18
Indicates whether the individual is 18 years of age or older.
Derived from the myinfo.date_of_birth field.
string (enum: true and false)
e.g. true
Age above 21 years old
myinfo.is_age_above_21
Indicates whether the individual is 21 years of age or older.
Derived from the myinfo.date_of_birth field.
string (enum: true and false)
e.g. true
Public Officer Employment Details
pocdex.public_officer_details
List of public officer employments.
string (stringified array of objects with the following attributes:
- work_email
- agency_name
- department_name
- employment_type
- employment_title
)
e.g. []or
Number of Public Officer Employments
pocdex.number_of_employments
Number of public officer employments.
string (to be casted as number)
e.g. 1
Please note that if you are not a public sector employee, you will only have access to two data fields: OpenID and NAME. If you require additional user data fields, please fill out this request form. Any additional data fields that are requested must adhere to our privacy and data protection policies. We will then review your request and get back to you as soon as possible.
Proof Key for Code Exchange (PKCE) is an OAuth 2.0 enhancement and protects against various potential vulnerabilities such as authorization code interception. A unique PKCE pair must be generated for each request and consists of a code_verifier and a code_challenge .
Code verifier
The code_verifier should be a high-entropy cryptographic random string with an ABNF as follows
Code challenge
The code_challenge should be generated from the code_verifier using the S256 code challenge method. The S256 transformation is described below together with the ABNF of the code_challenge.
The code_challenge must be sent to the sgID authorization server when initiating an authorization request, whereas the code_verifier must be provided when exchanging the OAuth authorization code for an access token. This allows the sgID server to verify that the server exchanging the access token is the same server that initiated the request!
Here are some cryptography libraries you could use to generate these values:
To allow your user to login into your app with sgID, you need to create an sgID authorization URL.
Your app should redirect your user's browser to this authorization URL, which will display a QR code that they can scan to authenticate with the Singpass mobile app:
You will need to supply the following query string parameters:
Key
Value
response_type
Must be set to code because sgID only supports the authorization code flow
client_id
Provided to you during
redirect_uri
After the user authenticates with the Singpass mobile app, the user's browser will be redirected back to the callback URL you provided, together with the authorization code and a state value.
To exchange the code for the access token and ID token, make a POST request to
with the following request body parameters:
Key
Value
client_id
Provided to you during
client_secret
Provided to you during
code
You should receive a response with the following attributes:
Key
Value
access_token
Access Token to be used with retrieving the encrypted payload from user info endpoint
id_token
JWT token with the associated user claims. Encodes the following:
iss (hostname)
sub (end user's unique identifier)
aud (client id)
Example JSON response body:
Once you have the access token, you can use it to request information about the user corresponding to the scopes that you requested. To do so, make a GET request to
with the access token you received in the previous step. Example request:
You should receive a response with the following attributes:
Key
Value
sub
End user's unique identifier for your client - This is the same value as the sub claim in the id_token returned from the previous response.
Note that as part of sgID's privacy-preserving measures, each end user's unique identifier is different for each sgID client
key
An AES-128-GCM symmetric key, or a block key, that is encrypted with your client's RSA-2048 public key.
data
Example JSON response body:
As part of sgID's privacy-preserving measures, user data is transmitted in encrypted form, so that the sgID server is unable to read the data being transacted. The data is encrypted with a block key, which itself is encrypted with your client's public key so that only your client has access to the block key.
Therefore, to obtain the user data in plaintext, you will need to:
Decrypt the key received from the user info response with your client's private key. This will give you the block key.
Decrypt the data received from the user info response with the block key you have just obtained.
An illustration of how to decrypt the data you received from the user info endpoint
Example decryption:
// We use the node-jose package for working with JWEs and JWKs
// https://github.com/cisco/node-jose
import { JWE, JWK } from 'node-jose'

/**
* Decrypts data into an object of
* plaintext key-value pairs
*
* @param {string} encKey - encrypted block key
* @param {array} block - data
* @param {string} privateKeyPem - private key in pem format
* @returns {object}
*/
async function decryptData(encKey, block, privateKeyPem) {
 const result = {}

 // Decrypted encKey to get block key
 const privateKey = await JWK.asKey(privateKeyPem, 'pem')
 const key = await JWE.createDecrypt(privateKey).decrypt(encKey)

 // Parse the block key
 const decryptedKey = await JWK.asKey(key.plaintext, 'json')

 // Decrypt data
 for (const [key, value] of Object.entries(block)) {
   const { plaintext } = await JWE.createDecrypt(decryptedKey).decrypt(value)
   result[key] = plaintext.toString('ascii')
 }

 return result
}
from jwcrypto import jwk, jwe

def decrypt_data(self, encrypted_key: str, encrypted_data: dict):
    # Load private_key
    private_key = jwk.JWK.from_pem(self.private_key.encode("utf-8"))
    jwe_key = jwe.JWE()

    # Decrypt encrypted_key to get block_key
    jwe_key.deserialize(encrypted_key, key=private_key)
    block_key_json = jwe_key.payload

    # Load block_key
    block_key = jwk.JWK.from_json(block_key_json.decode("utf-8").replace("'", '"'))
    jwe_data = jwe.JWE()

    # Initialise dict
    data_dict = {}

    for field in encrypted_data:
        # Decrypt encrypted_data[field] to get actual_data
        jwe_data.deserialize(encrypted_data[field], key=block_key)
        data_dict[field] = jwe_data.payload.decode("utf-8")

    return data_dict
{
    "sub": "abcdef",
    "key": "eyJhbGcDpgYRL4chyXTjgim...[truncated]...Gxa2tO7nghnu-ewD5ZqA",
    "data": {
        // Note: this will contain all the scopes you requested
        "myinfo.nric_number": "eyJlbmMiOiJ...[truncated]...QafqHmGERc3A",
        "myinfo.name": "eyJlbmMiOi...[truncated]...UgJ9hDSTNLVw",
        "myinfo.passport_expiry_date": "eyJlbmMiOi...[truncated]...UvS41pKk9VKQ",
    }
}
sgID only supports the S256 code challenge method as the plain method is insecure (see the ) and only exists for backwards compatibility reasons.
Step 2: Create an authorization URL to redirect to
Step 3: Exchange auth code for access token and ID token
The ID token is signed with sgID's private key. It is highly recommended that you verify the ID token with our public keys, which can be found .
Step 4: Request for user info with access token
Step 5: Decrypt the user info payload
Express (with Single-Page App frontend)
Integrating an Express server with sgID
This page provides a step-by-step guide on how to integrate the TypeScript SDK in a simple Express server. This Express server will be used as a backend server for a SPA frontend.
To illustrate our example, we have prepared a demo app which will allow you to retrieve your user's name and favorite ice cream flavor after they log in with sgID.
sgID login page with an ice cream flavour selector
If you have not already obtained your client credentials via registration, please before proceeding.
For this example, you should add:
1. [openid, myinfo.name] as the scopes and
2. http://localhost:5001/api/redirect as a redirect URL
Running the example locally
Step 1: Clone the repo
To run the example locally, clone from our source code by running:
# Clone the frontend repository
git clone https://github.com/opengovsg/sgid-demo-frontend-spa.git
cd sgid-demo-frontend-spa
cat .env.example > .env # Copy the `.env.example` file
npm install

cd ..

# Clone the backend repository
git clone https://github.com/opengovsg/sgid-client.git
cd sgid-client/examples/express
cat .env.example > .env # Copy the `.env.example` file
npm install
Step 2: Update your environment variables
Update your .env file with your client credentials.
In separate terminals, run the frontend and the backend.
# In the /sgid-client/examples/express directory
npm run dev

# Open a new terminal and in the /sgid-demo-frontend-spa directory
npm run dev
Ensure that your backend Express server is running on and visit .
If you click on 'Login with Singpass' and authenticate with your Singpass mobile app, you should see your user info on the success screen.
In this section, we'll break down the different steps that our example app goes through.
In this step, we will create an instance of our SgidClient class which will help us to interface with the sgID server.
In the .env file created from the previous step, fill out your sgID credentials.
Next, initialize the SDK by calling the constructor and passing in the environment variables.
Before we can create the endpoints, we will need to configure the Express app.
When an end user clicks on the sign in button on your application (e.g. 'Login with Singpass app'), it should make a GET request to this endpoint to retrieve the authorization URL. The browser is then redirected to this authorization URL.
The /api/auth-url endpoint should do the following
Generate a session ID
Generate a PKCE pair (consisting of code challenge and code verifier)
Generate an authorization URL
After the user scans the QR code with their Singpass mobile app and authorizes your application to access the specified scopes, the sgID server will redirect the user's browser to the redirect_uri you specified earlier (either when initializing the SDK or when passed as a parameter to the authorizationUrl function).
The redirect will include the authorization code and the state (if provided earlier) in the form of query parameters. An example URL would look something like this
The /api/redirect endpoint should do the following
Retrieve the authorization code from query params, and the session ID from browser cookies
Retrieve the code verifier from session
Exchange the authorization code and code verifier for the access token
Once the browser has been redirected to a logged in/success page, your app can make a GET request to this endpoint which will use the access token stored in session to request user info from the sgID server.
The /api/userinfo endpoint should do the following
Retrieve the session ID from browser cookies
Retrieve the access token from memory using the session ID
Request user info using the access token
Now that your Express server has been set up properly, you will need to integrate your frontend application with it.
If you have followed the steps from , the frontend and backend examples have already been integrated for you.
However, if you would like to integrate with your own frontend application, there are two main steps you need to implement:
A page with a 'Login with Singpass' button
Click for the relevant code in the frontend repo.
The button will need to make a GET request to the /api/auth-url
You have reached the end of the Express step-by-step guide.
If you want to find out more about how sgID works, click here to .
If you have more questions about sgID, check out our for answers to common questions.
nonce (only returned if provided in authorization URL)
exp (seconds before auth request and access token expires)
A URL-encoded string of the scopes your client will request for
code_challenge
The code challenge used for PKCE. Used to prevent authorization code interceptions and cross-site request forgery (CSRF)
nonce (optional)
Randomly generated string to be returned in the id_token. Used to prevent replay attacks. Refer to the OpenID Connect documentation for implementation details
state (optional)
A unique and non-guessable value associated with each authentication request about to be initiated
The value returned to you as part of the callback URL
A cryptographically random string that was used to generate your code challenge in the authorization request.
JSON object which contains the data you requested in your application scope. To prevent sgID from reading the data, the payload is encrypted with the block key referenced in the definition for the key attribute in the same response body.
Refer to the following section for instructions on decrypting the payload.
Redirect the browser to a logged in page (or any page of your choice)
Return the user info
endpoint and then redirect the browser to the received authorization URL.
Fetching the user info after logging in
Click here for the relevant code in the frontend repo.
After the user logs in, the frontend can make a GET request to the /api/userinfo endpoint to retrieve the user info.
Breaking the example down
Step 1: Initialize the SDK
The main idea here is to load your sgID credentials in a secure way using environment variables instead of hard-coding them into your app.
Step 2: Create the /api/auth-url endpoint
Step 3: Create the /api/redirect endpoint
The sub is an end-user's unique sgID identifier.
If your application only needs to verify that a user is a real person with a Singpass account without needing to access any government-verified data, then you can stop here (after Step 3) and utilize the sub value to identify the user.
Step 4: Create the /api/userinfo endpoint
Step 5: Integrate the frontend and backend
Congratulations! 🎉
While these examples should work seamlessly in a local environment (i.e. localhost), they may not work if deployed (specifically if the frontend and backend are deployed on different domains).
This is due to the SameSite attribute on cookies. For these examples to work in a deployed environment, you would need to either
Utilize a reverse proxy to deploy the frontend and backend on the same domain; or
Set the SameSite attribute as None to be able to set cookies on a different domain
import { SgidClient } from '@opengovsg/sgid-client'

const PORT = 5001

const sgid = new SgidClient({
  clientId: String(process.env.SGID_CLIENT_ID),
  clientSecret: String(process.env.SGID_CLIENT_SECRET),
  privateKey: String(process.env.SGID_PRIVATE_KEY),
  redirectUri: `http://localhost:${PORT}/api/redirect`,
})
index.ts
import express, { Router } from 'express'
import cors from 'cors'
import cookieParser from 'cookie-parser'
import * as dotenv from 'dotenv'
import open from 'open'

dotenv.config()

const PORT = 5001

// Initialize the sgID SDK here

const app = express()

const apiRouter = Router()

const SESSION_COOKIE_NAME = 'exampleAppSession'
const SESSION_COOKIE_OPTIONS = {
  httpOnly: true,
}

type SessionData = Record<
  string,
  | {
      nonce?: string
      // Store state as search params to easily stringify key-value pairs
      state?: URLSearchParams
      accessToken?: string
      codeVerifier?: string
      sub?: string
    }
  | undefined
>

/**
 * In-memory store for session data.
 * In a real application, this would be a database.
 */
const sessionData: SessionData = {}

app.use(
  cors({
    credentials: true,
    origin: 'http://localhost:5173',
  }),
)

const initServer = async (): Promise<void> => {
  try {
    app.use(cookieParser())
    app.use('/api', apiRouter)

    app.listen(PORT, () => {
      console.log(`Server listening on port ${PORT}`)
      void open(`http://localhost:${PORT}`)
    })
  } catch (error) {
    console.error(
      'Something went wrong while starting the server. Please restart the server.',
    )
    console.error(error)
  }
}

void initServer()
index.ts
import crypto from "crypto"
import { generatePkcePair } from "@opengovsg/sgid-client"

apiRouter.get('/auth-url', (req, res) => {
  const iceCreamSelection = String(req.query.icecream)

  // Generate a session ID
  const sessionId = crypto.randomUUID()

  // Generate a PKCE pair
  const { codeChallenge, codeVerifier } = generatePkcePair()

  // Use search params to store state so other key-value pairs can be added easily
  const state = new URLSearchParams({
    icecream: iceCreamSelection,
  })

  // Generate an authorization URL
  const { url, nonce } = sgid.authorizationUrl({
    // We pass the user's ice cream preference as the state,
    // so after they log in, we can display it together with the
    // other user info.
    state: state.toString(),
    codeChallenge,
    // Scopes that all sgID relying parties can access by default
    scope: ['openid', 'myinfo.name'],
  })

  // Store code verifier, state, and nonce
  sessionData[sessionId] = {
    state,
    nonce,
    codeVerifier
  }

  // Return the authorization URL
  return res
    .cookie(SESSION_COOKIE_NAME, sessionId, SESSION_COOKIE_OPTIONS)
    .json({ url })
})
apiRouter.get('/redirect', async (req, res): Promise<void> => {
  // Retrieve the authorization code and session ID
  const authCode = String(req.query.code)
  const state = String(req.query.state)
  const sessionId = String(req.cookies[SESSION_COOKIE_NAME])

  // Retrieve the code verifier from memory
  const session = sessionData[sessionId]

  // Validate that the state matches what we passed to sgID for this session
  if (session?.state.toString() !== state) {
    res.redirect('/error')
    return
  }

  // Validate that the code verifier exists for this session
  if (!session?.codeVerifier) {
    res.redirect(`${frontendHost}/error`)
    return
  }

  // Exchange the authorization code and code verifier for the access token
  const { accessToken, sub } = await sgid.callback({
    code: authCode,
    nonce: session.nonce,
    codeVerifier: session.codeVerifier,
  })

  // Store the access token and sub in session
  session.accessToken = accessToken
  session.sub = sub
  sessionData[sessionId] = session

  // Successful login, redirect to logged in state
  res.redirect('/logged-in')
})
index.ts
apiRouter.get('/userinfo', async (req, res) => {
  // Retrieve the session ID
  const sessionId = String(req.cookies[SESSION_COOKIE_NAME])

  // Retrieve the access token and sub
  const session = sessionData[sessionId]
  const accessToken = session?.accessToken
  const sub = session?.sub

  // User is not authenticated
  if (session === undefined || accessToken === undefined || sub === undefined) {
    return res.sendStatus(401)
  }

  // Request user info using the access token
  const userinfo = await sgid.userinfo({
    accessToken,
    sub
  })

  // Add ice cream flavour (state) to userinfo
  userinfo.data.iceCream = session.state?.get('icecream') ?? 'None'

  // Return the user info
  return res.json(userinfo)
})
Next.js (server-side rendering)
This page provides a step-by-step guide on how to integrate the TypeScript SDK in a Next.js (>= 13.4) project with server-side rendering (SSR) using the app router, server components, and middleware.
To illustrate our example, we will create a demo app which will allow you to retrieve your user's name and favorite ice cream flavor after they log in with sgID.
sgID login page with an ice cream flavour selector
If you have not already obtained your client credentials via registration, please before proceeding.
For this example, you should add:
1. [openid, myinfo.name] as the scopes and
2. http://localhost:5001/success as a redirect URL
Running the example locally
Step 1: Clone the repo
To run the example locally, clone from our source code by running:
git clone https://github.com/opengovsg/sgid-client.git
cd sgid-client/examples/nextjs-ssr
cat .env.example > .env # Copy the `.env.example` file
npm install
Step 2: Update your environment variables
Update your .env file with your client credentials.
# In the /sgid-client/examples/nextjs-ssr directory
npm run dev
Visit to check that your app is running.
If you click on 'Login with Singpass' and authenticate with your Singpass mobile app, you should see your user info on the success screen.
In this section, we'll break down the different steps that our example app goes through.
In this step, we will create an instance of our SgidClient class which will help us to interface with the sgID server.
In the .env file created from the previous step, fill out your sgID credentials.
Next, Initialize the SDK by calling the constructor and providing your client credentials.
To maintain session data across requests, we will need to initialize an in-memory store for our server.
The purpose of this middleware is to generate a session ID and set it in the browser's cookies when the user visits the site. This session ID is important for the server to identify the browser and track the session data through the login flow.
Now, we need to create a button to redirect the browser to the /login page. Additionally, we will be creating an ice cream flavour selector in order to demonstrate the OAuth 2.0 protocol's ability to carry over state.
In the following examples, we will not include any styling in order to keep the code snippet short. If you would like to view and interact with an example with styling, feel free to refer to the .
As we will be using useState, this component will be a .
Next, add the log in button to the home page as such.
When the user clicks on the 'Login with Singpass' button, it should direct them to the /login page which will generate the authorization URL to redirect the browser to.
The server function handleLogin will do the following.
Retrieve the session ID from the browser cookies (that was set by the middleware)
Generate a PKCE pair (consisting of code challenge and code verifier)
Generate an authorization URL
Once the end-user has successfully authorized your application with their Singpass mobile app, the sgID server will redirect the browser to the provided redirect URL.
When the browser visits this URL, the following will happen.
The authorization code is retrieved from the URL search params
The code is exchanged for an access token
The user info is requested with the access token
Now if you run your Next.js app, click on Login with Singpass and complete the authorization flow with your Singpass mobile app, you should be brought to this success page where you can view your personal details as well as your ice cream flavour selected on the login page.
The purpose of this page is to demonstrate how to retrieve the user data stored in-memory for subsequent requests. We will simply be creating a dummy page that displays the user info just like in the previous step.
If you complete the log in flow once again but click on the 'View user info' button, you will be brought to this /login page where you can view user data. To ensure that the user info has been properly stored in the in-memory store, try refreshing the page - you should see that the user info can still be fetched by the page.
You have reached the end of the Next.js (SSR) step-by-step guide.
The for this example can be found here which includes an /logout page (and middleware) for logging out, styling with Tailwind CSS, and a README on how to run the example locally.
If you want to find out more about how sgID works, click here to .
If you have more questions about sgID, check out our for answers to common questions.
Next.js (client-side rendering)
This page provides a step-by-step guide on how to integrate the TypeScript SDK in a project using the pages router, api routes and client-side rendering (CSR).
To illustrate our example, we have prepared a demo app which will allow you to retrieve your user's name and favorite ice cream flavor after they log in with sgID.
To run the example locally, clone from our by running:
Update your .env file with your client credentials.
Store the code verifier in the in-memory store with the session ID as the key
Redirect the browser to the authorization URL
The user info is stored in-memory for subsequent requests
The user info is used to generate the HTML page on the server
Breaking the example down
Step 1: Initialize the SDK
The main idea here is to load your sgID credentials in a secure way using environment variables instead of hard-coding them into your app.
Step 2: Initialize an in-memory store for sessions
In a production environment, your session data should be stored in a database but for our example, we will be using an in-memory store to reduce complexity.
Step 3: Create the middleware for setting a session ID in cookies
Step 4: Create a button to redirect to /login
Step 5: Create the /login page which redirects to the authorization URL
Step 6: Create the login /success page
If this is sufficient for your application and you do not need user data for any other further actions, congratulations! You can stop reading here. However, if you would like to use user data on other routes and pages, continue on to the next step.
Step 7: Create a /userinfo page to fetch user info from session store
/**
 * We place the store in the global object to prevent it from being cleared whenever compilation happens
 */
declare global {
  var store: Map<string, Session> | undefined
}

type Session = {
  state?: string;
  nonce?: string;
  codeVerifier?: string;
  accessToken?: string;
  userInfo?: Record<string, string>;
  sub?: string;
};

let store: Map<string, Session>

if (process.env.NODE_ENV === 'production') {
  store = new Map<string, Session>()
} else {
  // If the store does not exist, initialize it
  if (!global.store) {
    global.store = new Map<string, Session>()
  }
  store = global.store
}

export { store }
src/middleware.tsx
import { NextRequest, NextResponse } from "next/server";
import { v4 as uuidv4 } from "uuid";

export async function middleware(req: NextRequest) {
  switch (req.nextUrl.pathname) {
    case "/":
      // Generate new session ID
      const sessionId = req.cookies.get("sessionId")?.value || uuidv4();

      // Set session ID in cookie
      const res = NextResponse.next();
      res.cookies.set({
        name: "sessionId",
        value: sessionId,
        httpOnly: true,
      });
      return res;
  }
}
In this step, we will create an instance of our SgidClient class which will help us to interface with the sgID server.
In the .env file created from the previous step, fill out your sgID credentials.
Next, initialize the SDK by calling the constructor and providing your client credentials.
To maintain session data across requests, we will need to initialize an in-memory store for our server.
When an end user clicks on the sign in button on your application (e.g. 'Login with Singpass app'), it should redirect the browser to this endpoint.
Clicking 'Login with Singpass app' redirects the browser to the /api/auth-url endpoint
The /api/auth-url endpoint should do the following
Generate a session ID
Generate a PKCE pair (consisting of code challenge and code verifier)
Generate an authorization URL
Store the code verifier in the in-memory store with the session ID as the key
Set the session ID in the browser's cookies
Redirect the browser to the authorization URL
After the user scans the QR code with their Singpass mobile app and authorizes your application to access the specified scopes, the sgID server will redirect the user's browser to the redirect_uri you specified earlier (either when initializing the SDK or when passed as a parameter to the authorizationUrl function).
The redirect will include the authorization code and the state (if provided earlier) in the form of query parameters. An example URL would look something like this
The /api/redirect endpoint should do the following
Retrieve the authorization code from query params, and the session ID from browser cookies
Retrieve the code verifier from the in-memory store
Exchange the authorization code and code verifier for the access token
Store the access token and sub in the in-memory store
Redirect the browser to a logged in page (or any page of your choice)
Once the browser has been redirected to a logged in/success page, your app can make a GET request to this endpoint which will use the access token stored in session to request user info from the sgID server.
The /api/userinfo endpoint should do the following:
Retrieve the session ID from browser cookies
Retrieve the access token from the in-memory store using the session ID
Request user info using the access token
Store user info in the in-memory store
Return the user info
With this step, the API endpoints are completed. In the next 2 steps, we will complete the Next.js application by creating the user interface to interact with these endpoints.
Now, we need to create a button to redirect the browser to the /api/auth-url endpoint.
In the following examples, we will not include any styling in order to keep the code snippet short. If you would like to view and interact with an example with styling, feel free to refer to the source code.
Now when you run your Next.js app and visit http://localhost:5001, you should see a Login with Singpass button which when clicked should bring you to the sgID approval page with the QR code.
After the /api/redirect endpoint completes the request and the user info is stored in the in-memory store, the browser will be redirected to the /logged-in page.
The redirection to this page also marks that the user has successfully logged in and your application should be able to freely retrieve user info from the in-memory store.
As such, we will make a GET request to the /api/userinfo endpoint on this page and render the user info. As with above, we will omit styling from the following example.
Now if you run your Next.js app, click on Login with Singpass and complete the authorization flow with your Singpass mobile app, you should be brought to this success page where you can view your personal details as well as your ice cream flavour selected on the login page.
You have reached the end of the Next.js (CSR) step-by-step guide.
The source code for this example can be found here which includes a /api/logout API endpoint for logging out, styling with Tailwind CSS, and a README on how to run the example locally.
# In the /sgid-client/examples/nextjs-csr directory
npm run dev
If you have not already obtained your client credentials via registration, please register your client before proceeding.
For this example, you should add:
1. [openid, myinfo.name] as the scopes and
2. http://localhost:5001/api/redirect as a redirect URL
/**
 * We place the store in the global object to prevent it from being cleared whenever compilation happens
 */
declare global {
  var store: Map<string, Session> | undefined
}

type Session = {
  state?: string;
  nonce?: string;
  codeVerifier?: string;
  accessToken?: string;
  userInfo?: Record<string, string>;
  sub?: string;
};

let store: Map<string, Session>

if (process.env.NODE_ENV === 'production') {
  store = new Map<string, Session>()
} else {
  // If the store does not exist, initialize it
  if (!global.store) {
    global.store = new Map<string, Session>()
  }
  store = global.store
}

export { store }
pages/api/auth-url.ts
// Server-side code
import type { NextApiRequest, NextApiResponse } from "next";
import { v4 as uuidv4 } from "uuid";
import { store } from "../../lib/store";
import { sgidClient } from "../../lib/sgidClient";
import { setCookie } from "cookies-next";
import { generatePkcePair } from "@opengovsg/sgid-client";

export default function handler(req: NextApiRequest, res: NextApiResponse) {
  let { state } = req.query;
  state = String(state);

  // Generate a session ID
  const sessionId = uuidv4();

  // Generate a PKCE pair
  const { codeChallenge, codeVerifier } = generatePkcePair();

  // Generate an authorization URL
  const { url, nonce } = sgidClient.authorizationUrl({
    state,
    codeChallenge,
  });

  // Store the code verifier, state, and nonce
  store.set(sessionId, { state, nonce, codeVerifier });

  // Set the sessionID in the browser's cookies
  setCookie("sessionId", sessionId, { req, res });

  // Redirect the browser to the authorization URL
  res.redirect(url);
}
// Server-side code
import type { NextApiRequest, NextApiResponse } from 'next'
import { store } from '../../lib/store'
import { sgidClient } from '../../lib/sgidClient'
import { getCookie, setCookie } from 'cookies-next'

export default async function handler(
  req: NextApiRequest,
  res: NextApiResponse,
) {
  // Retrieve the authorization code from query params
  let { code, state } = req.query

  // Retrieve the session ID from browser cookies
  const sessionId = getCookie('sessionId', { req, res })

  // Validating that the sessionID, contents in session, and auth code is present
  if (typeof sessionId !== 'string') {
    return res.status(401).send('Session ID not found in browser cookies')
  } else if (!code) {
    return res.status(400).send('Authorization code not found in query params')
  }
  code = String(code)

  const session = store.get(sessionId)

  if (!session) {
    return res.status(401).send('Session not found')
  } else if (state && state !== session.state) {
    return res.status(400).send('State does not match')
  }

  const { nonce, codeVerifier } = session

  if (!codeVerifier || typeof codeVerifier !== 'string') {
    return res.status(400).send('Code verifier not found')
  }

  // Exchange the auth code for the access token
  // At the end of this function, users are considered logged in by the sgID server
  const { accessToken, sub } = await sgidClient.callback({
    code,
    nonce,
    codeVerifier,
  })

  // Store the access token and sub
  const updatedSession = {
    ...session,
    accessToken,
    sub,
  }
  store.set(sessionId, updatedSession)

  res.redirect('/logged-in')
}
pages/api/userinfo.ts
// Server-side code
import type { NextApiRequest, NextApiResponse } from 'next'
import { store } from '../../lib/store'
import { sgidClient } from '../../lib/sgidClient'
import { getCookie } from 'cookies-next'

export default async function handler(
  req: NextApiRequest,
  res: NextApiResponse,
) {
  // Retrieve the session ID from browser cookies
  const sessionId = getCookie('sessionId', { req, res })

  if (typeof sessionId !== 'string') {
    return res.status(401).send('Session ID not found in browser cookies')
  }

  // Retrieve the access token from memory using the session ID
  const session = store.get(sessionId)

  if (!session) {
    return res.status(401).send('Session not found')
  }
  const { accessToken, sub } = session

  if (!accessToken || typeof accessToken !== 'string') {
    return res.status(400).send('Access token not in session')
  } else if (!sub || typeof sub !== 'string') {
    return res.status(400).send('Sub not in session')
  }

  // Request user info using the access token
  const { data } = await sgidClient.userinfo({ accessToken, sub })

  // Store user info in the in-memory store
  const updatedSession = {
    ...session,
    userInfo: data,
  }
  store.set(sessionId, updatedSession)

  const { accessToken: _, nonce: __, ...dataToReturn } = updatedSession

  // Return the user info
  res.json(dataToReturn)
}
The main idea here is to load your sgID credentials in a secure way using environment variables instead of hard-coding them into your app.
Step 2: Initialize an in-memory store for sessions
In a production environment, your session data should be stored in a database but for our example, we will be using an in-memory store to reduce complexity.
Step 3: Create the /api/auth-url endpoint
Step 4: Create the /api/redirect endpoint
The sub is an end-user's unique sgID identifier.
If your application only needs to verify that a user is a real person with a Singpass account without needing to access any government-verified data, then you can stop here (after Step 4) and utilize the sub value to identify the user.
Step 5: Create the /api/userinfo endpoint
Step 6: Create a button to redirect to /api/auth-url
Step 7: Create a /logged-in page to fetch and render user info